How to connect 20×4 LCD screen to arduino and make some animations
I’ve got arduino uno and in the basement i found a 20×4 character LCD display so i decided to put it to got use (it actually doesn’t make a big difference if you have 20×4 or 16×2 characters just a small programming change). For that i needed:
- breadboard
- potenciometer (10 k)
- LCD screen (support for Hitachi chipset, usually if a LCD has 16 connecters like the one on the bottom picture then is Hitachi HD44780 LCD controller supported)
- hook-up wires
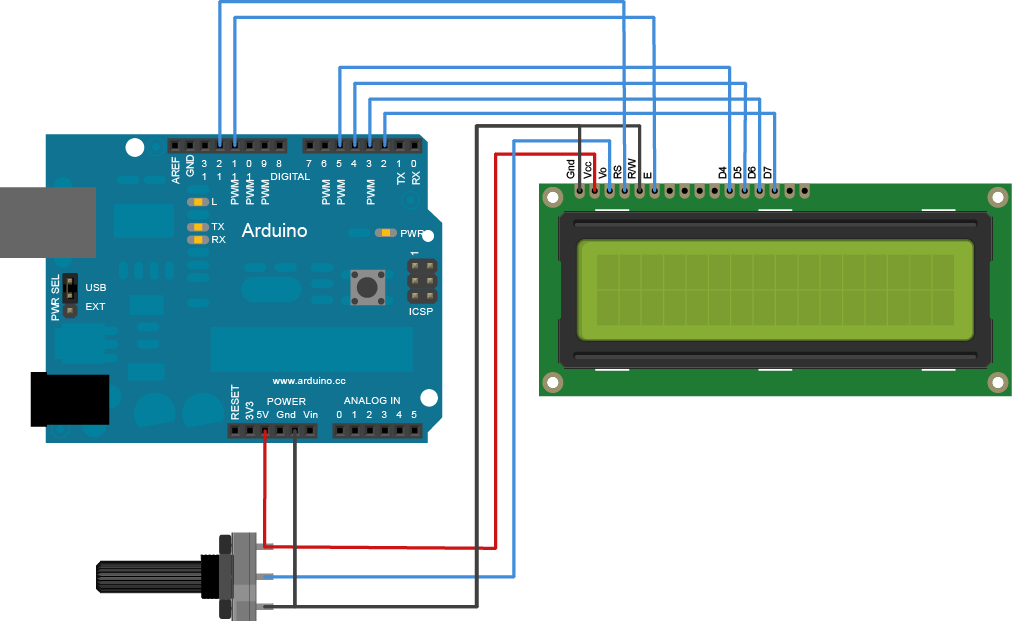
Everything has to be connected like so:
Instead of petenciometer you could use a resistor but with potenciometer you can also control contrast of the screen on the go. So if you have it.. use it. Pins D4, D5, D6 and D7 are used for transporting binary information about the image. You could also use 4 connectors left of them but because we would have to soulder 4 more wires will leave it as it is. From the point of view of you as a user there is no difference. First wire (from the left) is ground and second 5V power supply. Third is difference between Gnd and 5V from potenciometer with which we control contrast of the screen. RS is register select pin with which you write data to registers of the LCD screen and RW – read write pin. All the way on the right side are two pins for the power supply of the LCD background lightning, last one is Gnd and one before 5V.
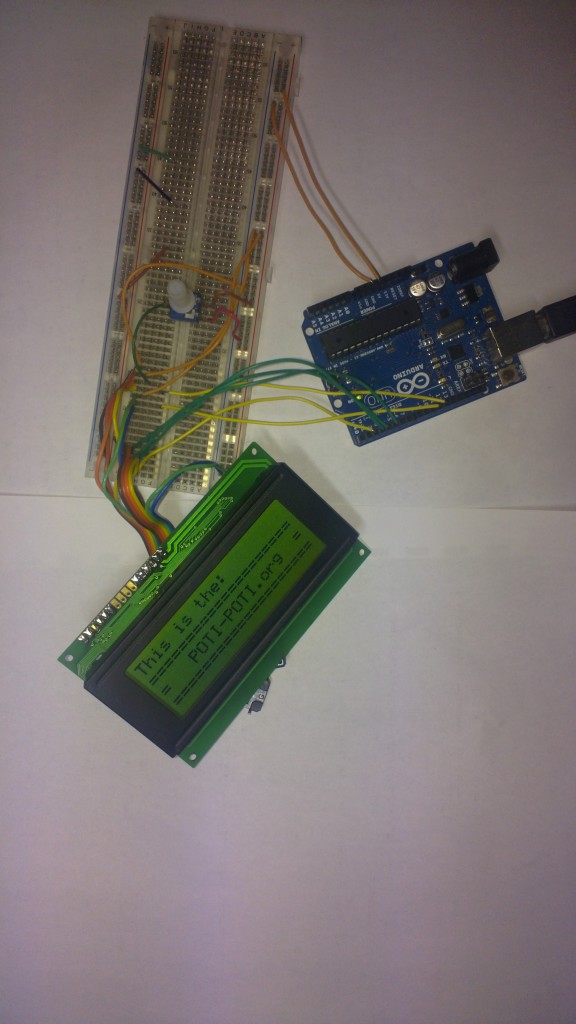
This is how it looks assembled:
Ok, its time to write our first app for the screen with the arduino
LiquidCrystal library, just copy paste the code to the arduino IDE:
// First we have to include the library for working with the LCD
#include <LiquidCrystal.h>

// Here we define connected pins to arduino so the library knows wich to use
LiquidCrystal lcd(12, 11, 5, 4, 3, 2);

void setup() {
  // define number of columns and rows:
  lcd.begin(20, 4);
  //set cursor at the beginning of the first line
  lcd.setCursor(0, 0);
  // Print a message to the LCD.
  lcd.print("This is the:");
  //set cursor at the beginning of the second
  lcd.setCursor(0, 1);
  lcd.print("====================");
  lcd.setCursor(0, 2);
  lcd.print("=  POTI-POTI.org   =");
  lcd.setCursor(0, 3);
  lcd.print("====================");
}

void loop() {

  }
The upper code wrote some static words on the screen.
We can now add something more to make everything a bit more dynamic:
// First we have to include the library for working with the LCD
#include <LiquidCrystal.h>

// Here we define connected pins to arduino so the library knows which to use
LiquidCrystal lcd(12, 11, 5, 4, 3, 2);

void setup() {
  // define number of columns and rows:
  lcd.begin(20, 4);
  //set cursor at the beginning of the first line
  lcd.setCursor(0, 0);
  // Print a message to the LCD.
  lcd.print("This is the:");
  //set cursor at the beginning of the second
  lcd.setCursor(0, 1);
  lcd.print("====================");
  lcd.setCursor(0, 2);
  lcd.print("=  POTI-POTI.org   =");
  lcd.setCursor(0, 3);
  lcd.print("====================");
}
void loop() {
  // We let the screen wait for 10 seconds so the first part is seen
  delay(10000);
  // Clear the screen
  lcd.clear();
  //set cursor at the beginning of the first line
  lcd.setCursor(0, 0);
  // Print a message to the LCD.
  lcd.print("POTI-POTI.org");
  //set cursor at the beginning of the first line
  lcd.setCursor(0, 2);
  // Print a message to the LCD.
  lcd.print("D-@");
  for (int i = 2; i < 19; i++) {
    // scroll one position right:
    lcd.setCursor(i, 2);
    // draw a flower top
    lcd.print("-@");
    // wait a bit:
    delay(250);
  }
  }
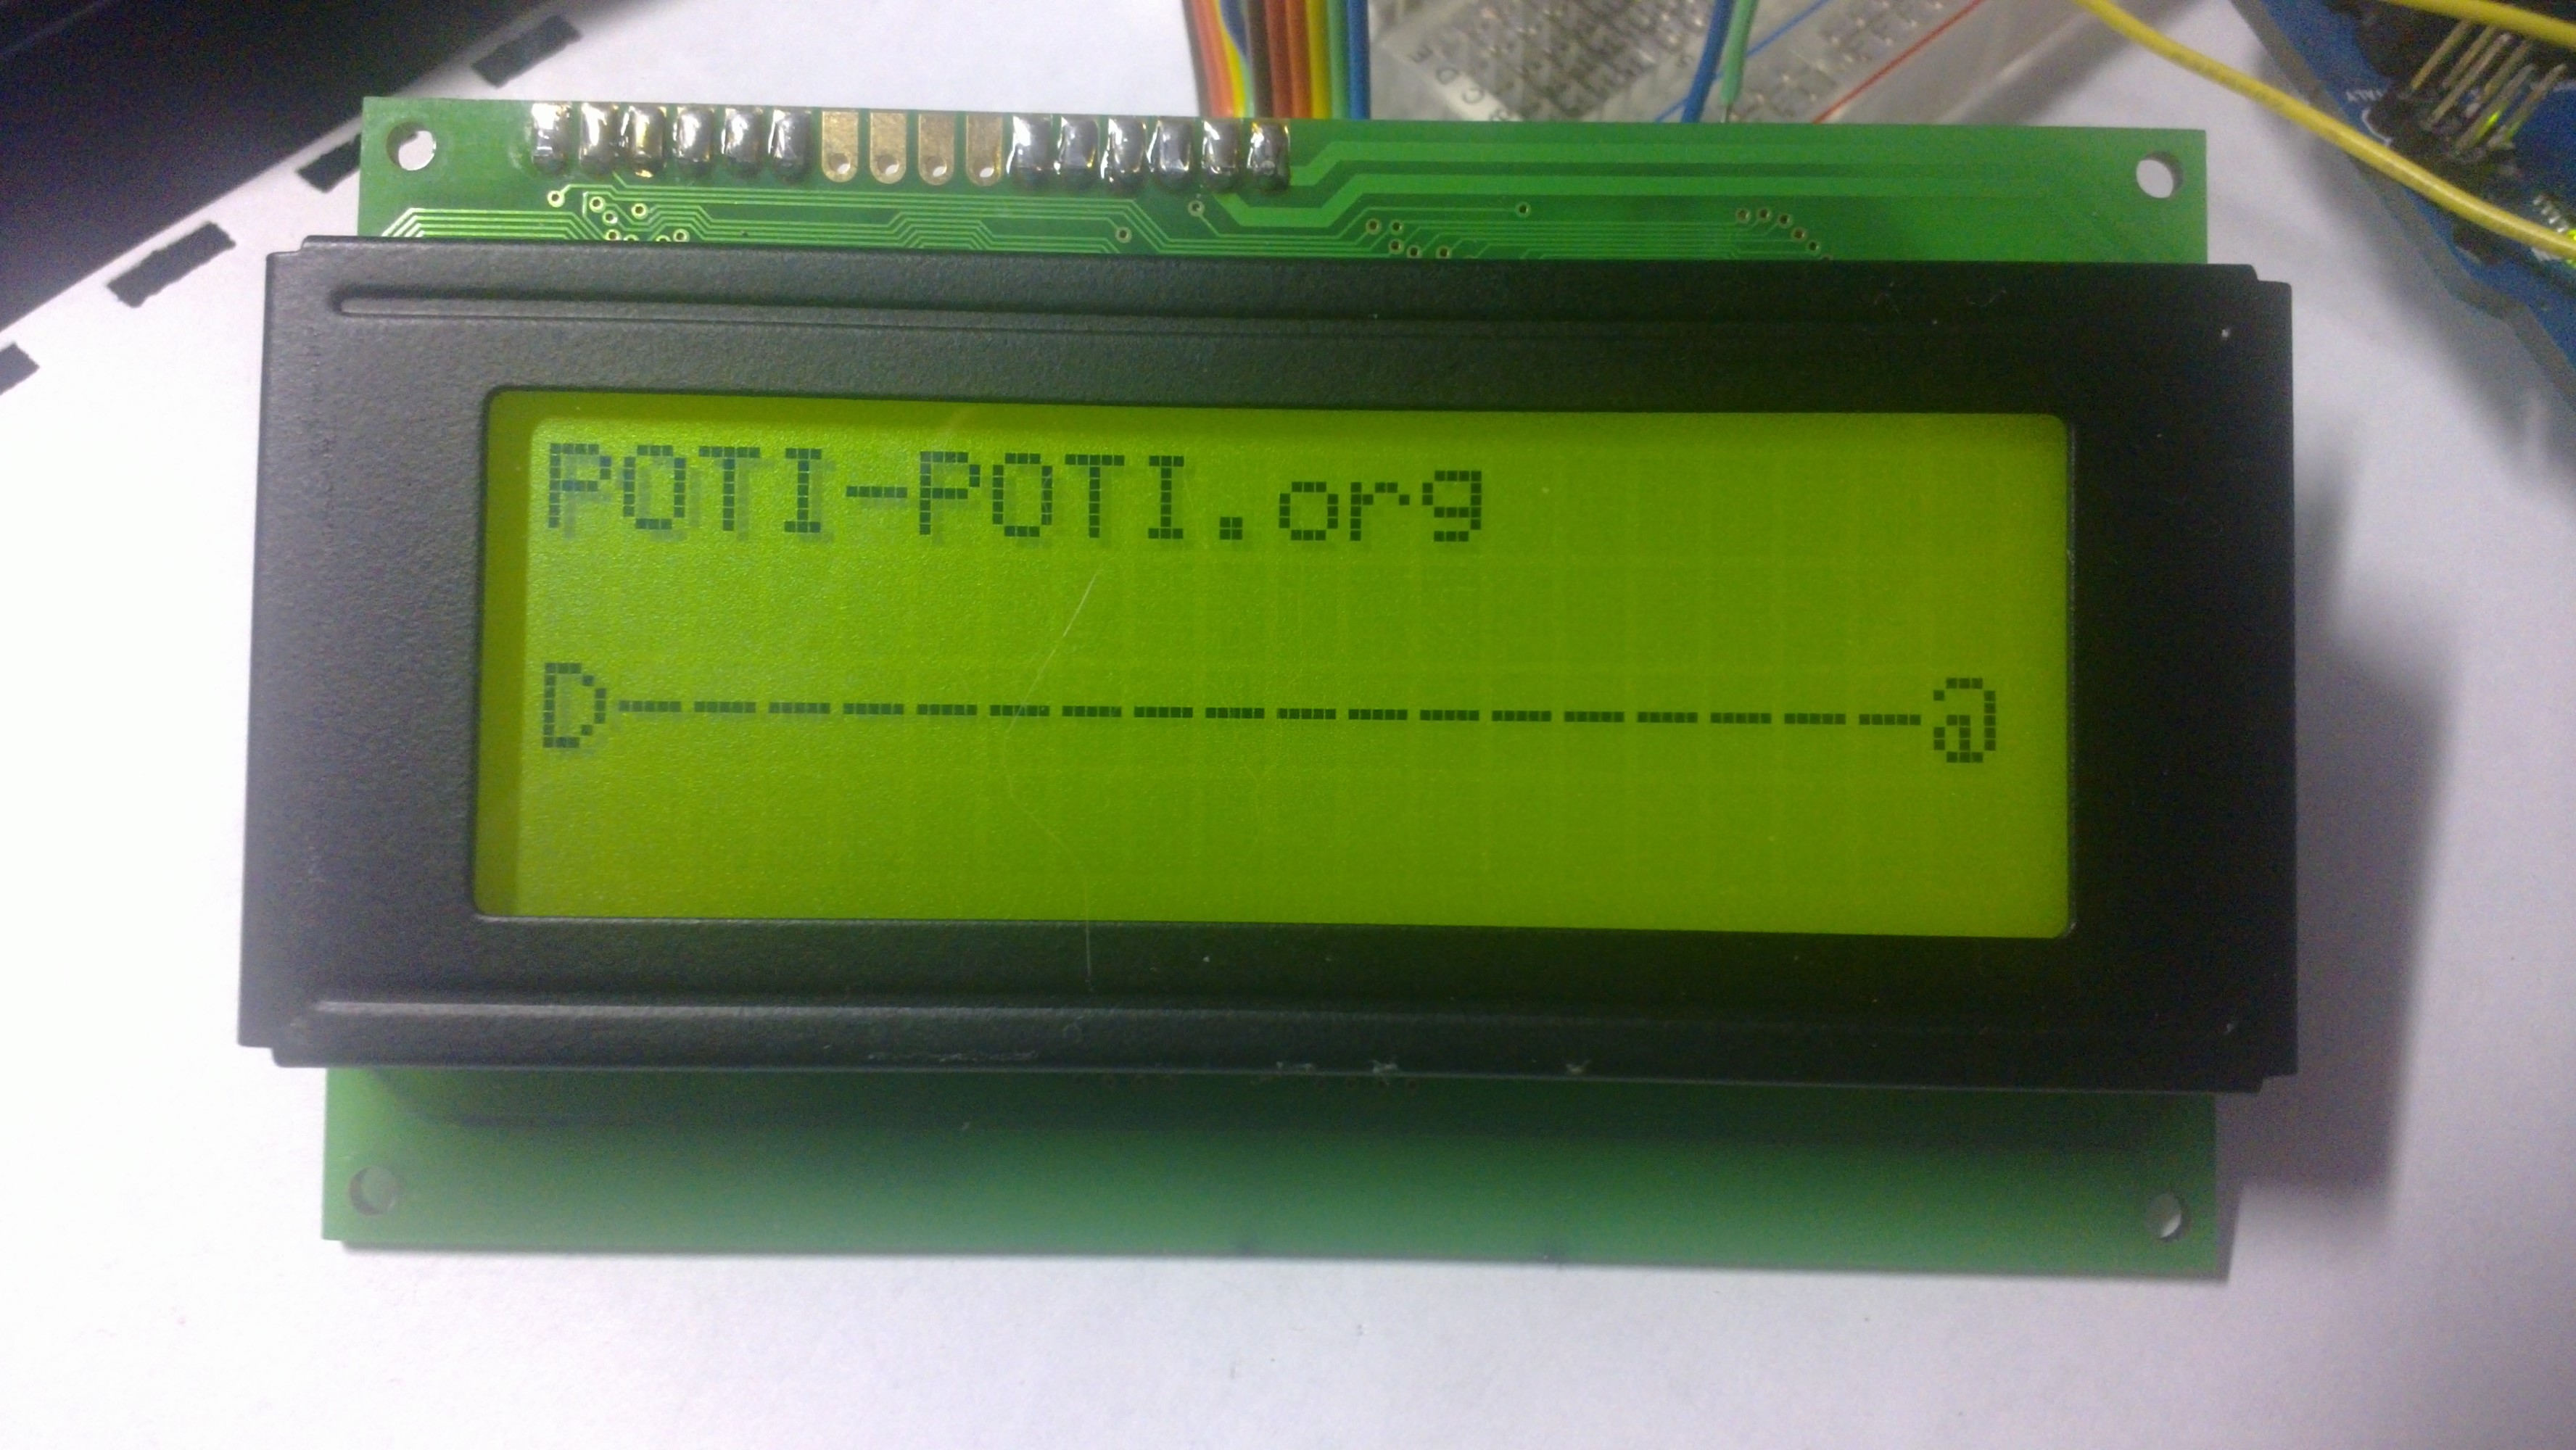
Now you have a flower that grows. But it looks kinda silly because the flower
does not have any leaves… We will change that by adding our own character in
the character set and including it in a drawing animation.
// First we have to include the library for working with the LCD
#include <LiquidCrystal.h>

// Here we define connected pins to arduino so the library knows wich to use
LiquidCrystal lcd(12, 11, 5, 4, 3, 2);

// Here we will define our own character that looks like leaf
// Every 1 in the block represents dark dot and 0 represents "white" dot
byte leaf[8] = {
  B00010,
  B00100,
  B01000,
  B11111,
  B00100,
  B00010,
  B00000,
};

// Here we setup arduino for working with LCD
void setup() {
  // here we create our new character
  lcd.createChar(0, leaf);
  // define number of columns and rows:
  lcd.begin(20, 4);
  //set cursor at the beginning of the first line
  lcd.setCursor(0, 0);
  // Print a message to the LCD.
  lcd.print("This is the:");
  //set cursor at the beginning of the second
  lcd.setCursor(0, 1);
  lcd.print("====================");
  lcd.setCursor(0, 2);
  lcd.print("=  POTI-POTI.org   =");
  lcd.setCursor(0, 3);
  lcd.print("====================");
}
void loop() {
  // We let the screen wait for 10 seconds so the first part is seen
  delay(10000);
  // Clear the screen
  lcd.clear();
  //set cursor at the beginning of the first line
  lcd.setCursor(0, 0);
  // Print a message to the LCD.
  lcd.print("POTI-POTI.org");
  //set cursor at the beginning of the first line
  lcd.setCursor(0, 2);
  // Print a message to the LCD.
  lcd.print("D-@");
  for (int i = 2; i < 19; i++) {
    // scroll one position right:
    lcd.setCursor(i, 2);
    // draw a flower top
    lcd.write("-@");
    //if i modulus 3 equals 0 change - with our character
    if(i%3==0)
    {
      lcd.setCursor(i, 2);
      lcd.write(byte(0));
    }
    // wait a bit:
    delay(250);
  }
  }
And now with the leaves looks like this:
Sometimes there is a problem with pixels being on or off where there are not suppose to,
the problem is kinda complicated but its fixed after flashing the arduino couple of times and reseting it.
There you go, youve learned how to cennect LCD screen to arduino and create a little animation 
